Raspberry Pi as Wi-Fi Repeater (part 1): Use an ethernet cable to directly connect your Raspberry Pi to a Linux laptop
Background
One day I woke up and found that my MacBook Pro could not connect to the school's wireless network. The error message is
Wi-Fi has the self assigned IP address 169.254.xxx.xxx and will not be able to connect to the Internet.And this problem only happens with this one particular computer on this one particular network. All other devices (Phone, iPad, etc.) work fine on this network. And this MacBook Pro works fine on literally every other network except this one.
My first reaction was that a problem occurred with my laptop. So I tried most of the solutions online to this error, such as:
- Restart
- Turn off then turn on (cold restart)
- Delete plist files related to network interfaces (e.g.
com.apple.airport.preferences.plist,NetworkInterfaces.plist, etc.) - Renew the DHCP Lease
- Delete the wireless connection in the network settings and add it again
The above methods all failed.
So now I began to suspect that the problem was not my computer but the school's router. So I sent network service an e-mail, and at the same time, I took out my old Raspberry Pi and plan to make a Wi-Fi repeater (also called Wi-Fi extender).
Simply put, it is:
MacBook Pro <~~~> Raspberry Pi 3B <~~~> RouterThe Raspberry Pi receives the wireless network signal from router and simultaneously shares the network to my MacBook Pro.
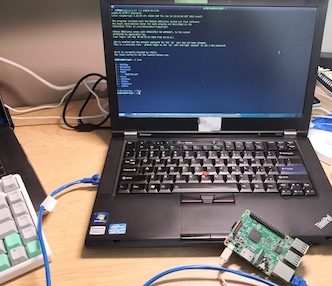
To do so, we need to configure the Raspberry Pi and install all the relevant softwares. Because my Raspberry Pi 3B does not have a display or input device, so-called headless, I need to configure it via an ethernet cable. Fortunately, because of my obsession with the classic ThinkPad notebook, I bought an old T420 earlier this year, and installed Lubuntu 18.04. It is perfect to use for connection with the Raspberry Pi.
Required hardware and software
If you don’t use an ethernet cable to directly connect the Raspberry Pi to the computer, another way is to manually configure the Raspberry Pi to connect to Wi-Fi and then connect via ssh, but this is more troublesome because the university's wireless network uses WPA2-Enterprise security standard, meaning when configuring the /etc/wpa_supplicant/wpa_supplicant.conf file in the Raspberry Pi, I need to fill in more than just username and password; I also need SSID, phase1, phase2, and various other parameters. So eventually I gave up doing this way.
To directly connect the Raspberry Pi to a Linux laptop via an ethernet cable, we need to configure a static IP for Pi. Here are what's required:
hardware:
- Raspberry Pi and power supply
- ethernet cable
software:
- nmap:
sudo apt install nmap - ifconfig:
sudo apt install net-tools - dnsmasq:
sudo apt install dnsmasq
Note: Since Lubuntu 18.04 does not come with ifconfig, we need to install it. If you have that command, then skip this step. In addition, for dnsmasq, there may be an error message after installation saying the service cannot start. This is because the default DNS port 53 is occupied and there is a conflict. We will deal with that later.
Setting up the Raspberry Pi
It is recommended to use a brand new system. The SD card on my old Raspberry Pi has a two-year-old Raspbian system. In retrospect, I think this is a major reason why it took me so long and still failed to configure the Pi. Therefore, I suggest installing a new OS to the SD card. At the time, I chose Raspberry Pi OS with desktop and recommended software - 2020-02-13. Coincidentally, one day later they released the latest version of Raspberry Pi OS - 2020-05-27. Though I don't think it will affect this guide.
I used Etcher to flash the OS image to SD card. After a successful flashing, there should be two partitions, boot and rootfs.
First, we want to create a new blank file in the boot partition, named ssh. The file does not require suffix or content. It is used to tell the OS to open the ssh service when Raspberry Pi is powered on. Because the service is turned off by default.
Then we need to configure a static IP for the Pi. Here I chose the Class A private IP address 10.42.0.x.
We need to open the rootfs partition in the command line, and modify etc/dhcpcd.conf (sudo vim etc/dhcpcd.conf), uncomment the Example Static IP configuration at line 44-48 and change to the following:
# Example static IP configuration:
interface eth0
static ip_address=10.42.0.64/24
static routers=10.42.0.1
static domain_name_servers=10.42.0.1 8.8.8.8 fd51:42f8:caae:d92e::1
Save the changes and exit Vim. We can eject the SD card now as we don't need to do more settings in the Pi's system files.
Setting up your laptop
Hosts file
First we have to solve the configuration problem of dnsmasq. Because the default port 53 is occupied, dnsmasq cannot run successfully (use systemctl status dnsmasq to view the current status of dnsmasq).
So let's first modify the system's Hosts file (sudo vim /etc/hosts) and add a line under 127.0.0.1:
127.0.0.1   localhost
10.42.0.1   dnsmasq
Here, the IP corresponding to dnsmasq is the IP of the routers set in Pi before. Save the changes and exit Vim.
dnsmasq
Next, modify dnsmasq.conf (sudo vim /etc/dnsmasq.conf):
The first modification is line 10, uncomment it and set the port number to 5353:
port=5353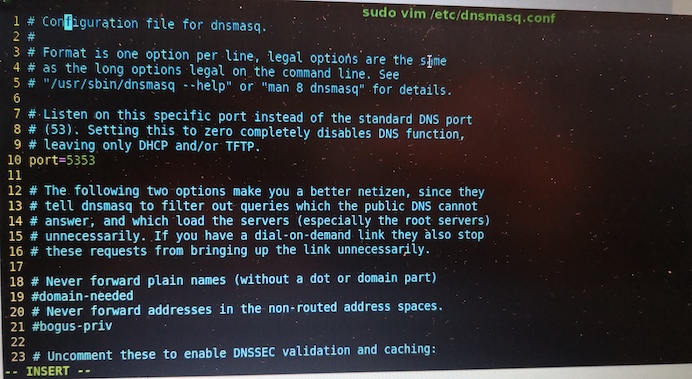
Next uncomment line 111 and change it to the following 2 lines:
listen-address=127.0.0.1
listen-address=10.42.0.1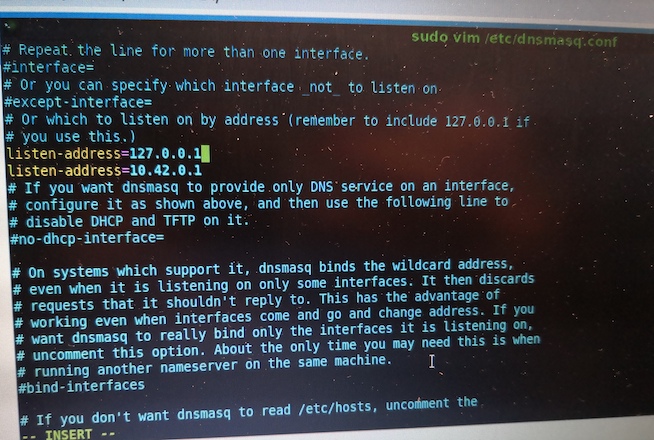
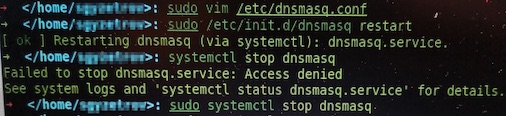
Then restart the dnsmasq service (sudo /etc/init.d/dnsmasq restart), this time it should be able to run successfully, then we close the dnsmasq service (systemctl stop dnsmasq).
Network Manager
Although I think Ubuntu and its derivatives all have Network Manager (with GUI) installed by default, here is the command to install Network Manager: sudo apt install network-manager.
The file we need to modify is NetworkManager.conf (sudo vim /etc/NetworkManager/NetworkManager.conf), add DNS=dnsmasq after [main]:
[main]
DNS=dnsmasq
plugins=ifupdown,keyfile
Save the changes and exit Vim. Then restart the computer.
Note: For the option of restarting the dnsmasq service and Network Manager (sudo service network-manager restart) instead of restarting the computer, I am not sure whether it does the trick. I can only recommend restarting the computer since that's what I did.
Create a new wired connection
After restarting, click on Network Settings, and create a new ethernet connection. We need to change the DHCP in IPv4 settings to 'Shared to other computers':
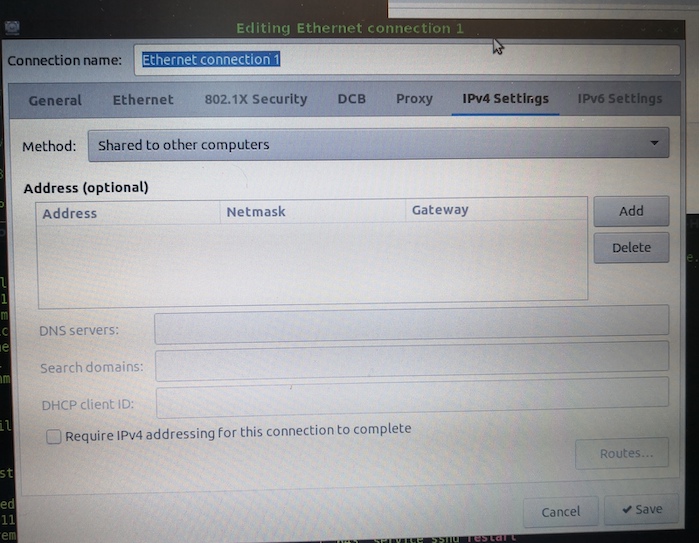
Then save changes.
ssh into Raspberry Pi
Power on your Pi, and connect it to your computer with an ethernet cable. After a while, you should be prompted that the newly created ethernet connection is now successfully connected.
We can use ifconfig to view the current connection information, we should focus on the item named enp0s25 or eth0:
enp0s25: [...]
        inet 10.42.0.1  netmask 255.255.255.0   broadcast 10.42.0.255
        inet6 [...]
        [...]
You can see that the IP is the routers' address we set in Raspberry Pi. Next, we need to confirm the IP address of our Pi itself. If nothing unexpected happens, it should be 10.42.0.64:
# Use nmap to find the IP address of the Raspberry Pi
$> nmap -sn 10.42.0/24
Starting Nmap 7.80 (https://nmap.org) at 2020-05-29 16:31 PDT
Nmap scan report for dnsmasq (10.42.0.1)
Host is up (0.015s latency).
map scan report for 10.42.0.64
Host is up (0.015s latency).
Nmap done: 256 IP addresses (2 host up) scanned in 2.30 seconds
We can see that 10.42.0.64 is found, so we ssh into it:
$> ssh pi@10.42.0.64And now it is successfully connected! Hope this guide helps someone!
References
[1] https://stackoverflow.com/questions/16040128/hook-up-raspberry-pi-via-ethernet-to-laptop-without-router#answer-54374837
[2] https://graspingtech.com/dnsmasq-ubuntu-18-04/